
Direct answer: one clue is not enough
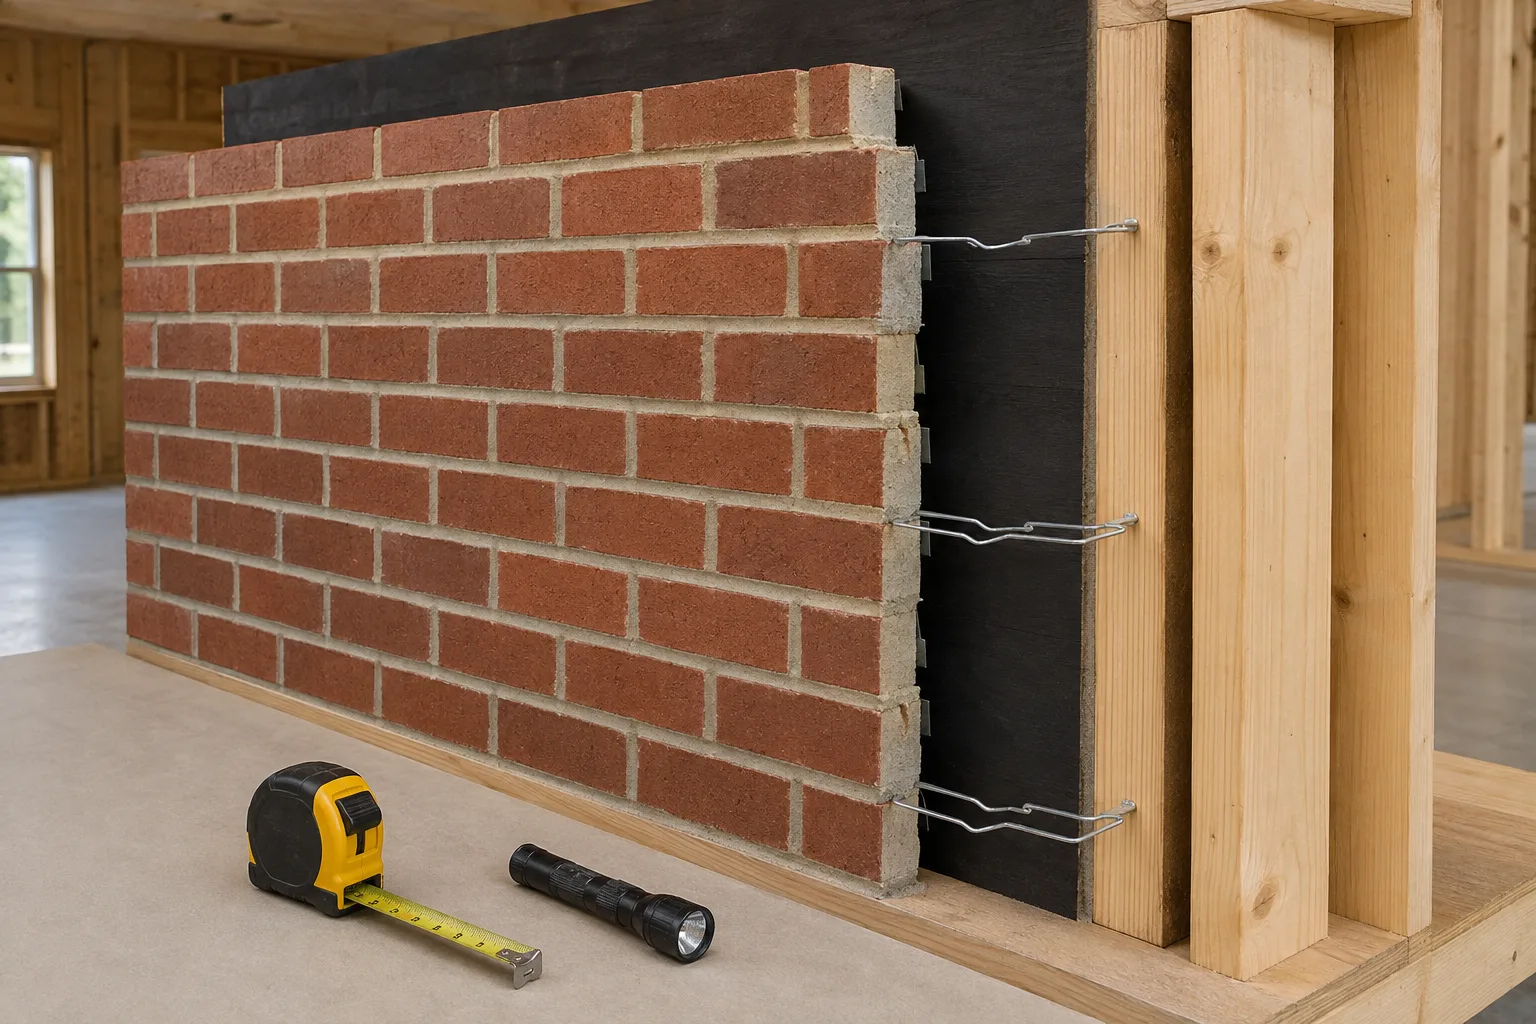
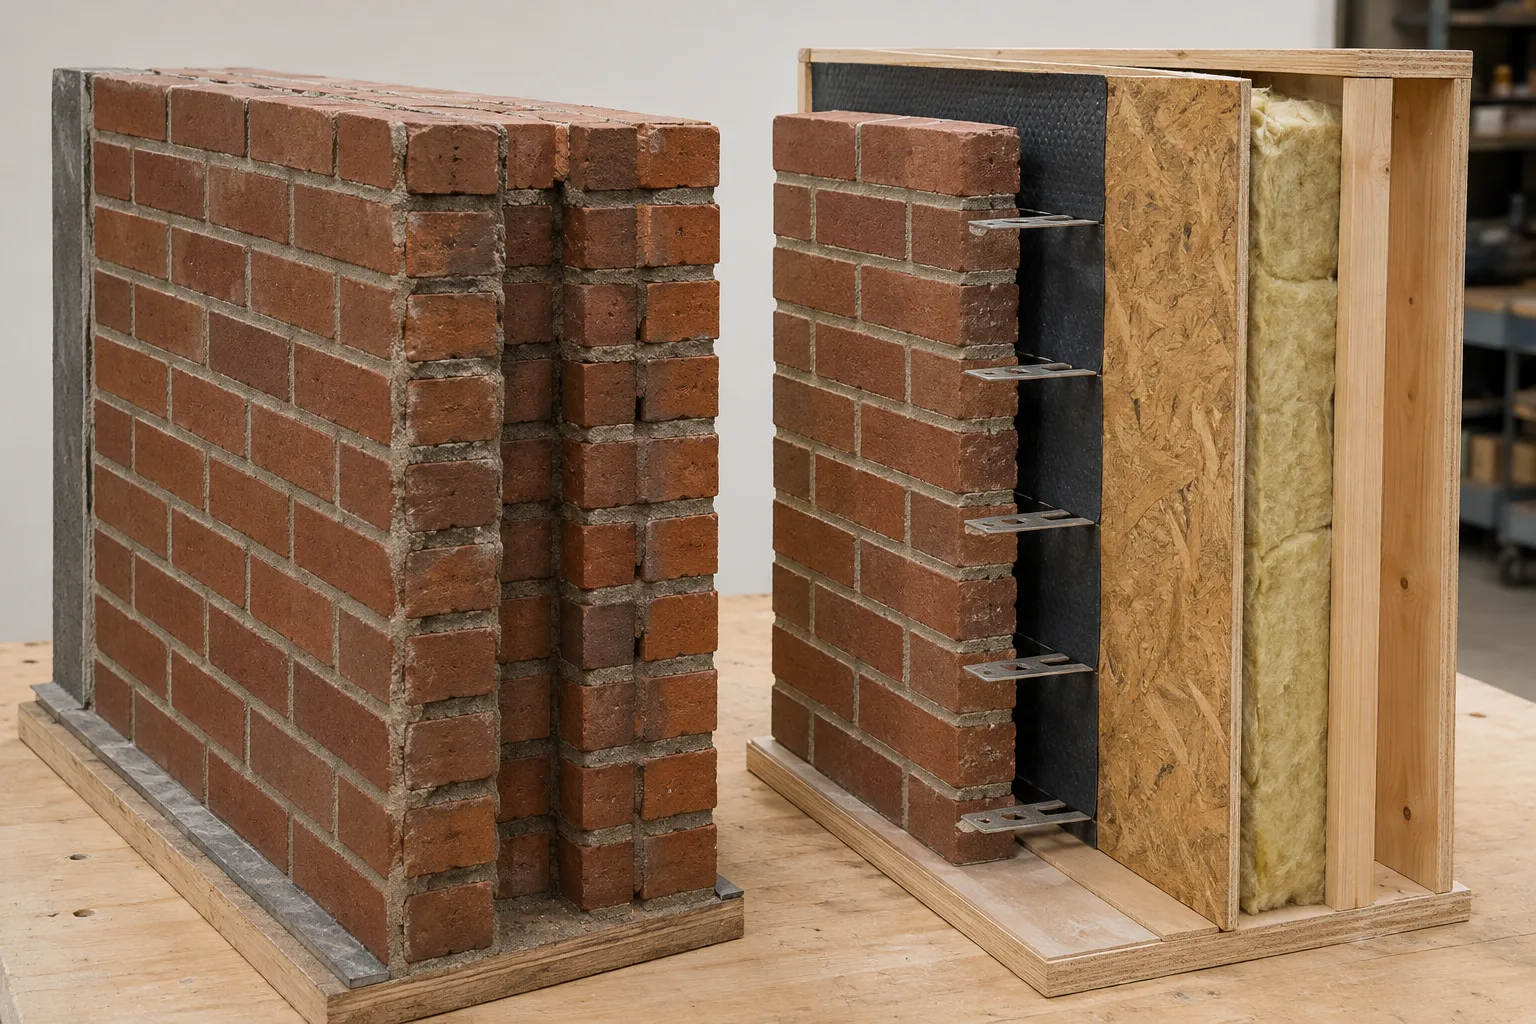
The most reliable practical answer comes from combining an already exposed wall edge or construction drawing with exterior drainage details and the wall's measured build-up. Anchored brick veneer is a single exterior brick wythe that is laterally tied to a backing system and normally separated from it by a drainage space. Older mass masonry can contain two or more masonry wythes tied together, while thin adhered brick is a finish bonded to a backing and is not a full brick wythe.
Do not decide from brick pattern, tapping, house age or the color of drill dust alone. Remodels, additions and repaired openings can put different assemblies on the same house. Record what each clue actually establishes, and leave the result as unknown if the clues conflict. For a heavy, moving, overhead or safety-related object, an unknown result means the attachment design is not ready.
- Best evidence: plans, permit details or a legitimate exposed edge
- Supporting evidence: weeps, flashing, wall thickness and backup visible at an opening
- Weak evidence: sound, age, bond pattern and dust color
- Unsafe evidence: an exploratory hole through an exterior wall
Compare the three assemblies people call brick walls
Brick Industry Association Technical Note 28 describes anchored brick veneer over wood framing as a nominal 3- or 4-inch exterior brick wythe, corrosion-resistant anchors and a prescribed air space. The veneer carries its own vertical weight to a foundation or other designed support, while ties transfer out-of-plane forces to the backing. That is different from treating the face brick as the structural wall behind a bracket.
A multi-wythe masonry wall uses more than one thickness of masonry. Its inner wythe may also be brick, or a contemporary veneer assembly may use concrete masonry unit backing across a drainage space. Hollow clay brick and hollow CMU add another variable: their faces, webs and cells are not equivalent to solid concrete. Thin adhered brick is thinner still and should be treated as a finish until the backing is identified.
| Possible assembly | What may be behind the face | What the face alone does not prove |
|---|---|---|
| Anchored full-brick veneer | Drainage space, membrane or sheathing, then wood/steel framing or masonry backup | That a generic masonry anchor may stop in or transfer load through the veneer |
| Multi-wythe brick masonry | A second or additional brick wythe connected to the outer wythe | Condition, unit solidity, thickness or acceptable anchor design |
| Brick veneer over CMU | Drainage space followed by hollow, partially grouted or fully grouted block | Where webs, cells or grout occur behind the intended hole |
| Thin adhered brick | Mortar or adhesive setting bed over sheathing, concrete, CMU or another substrate | That the thin finish supplies structural embedment |
Look outside for a group of veneer clues
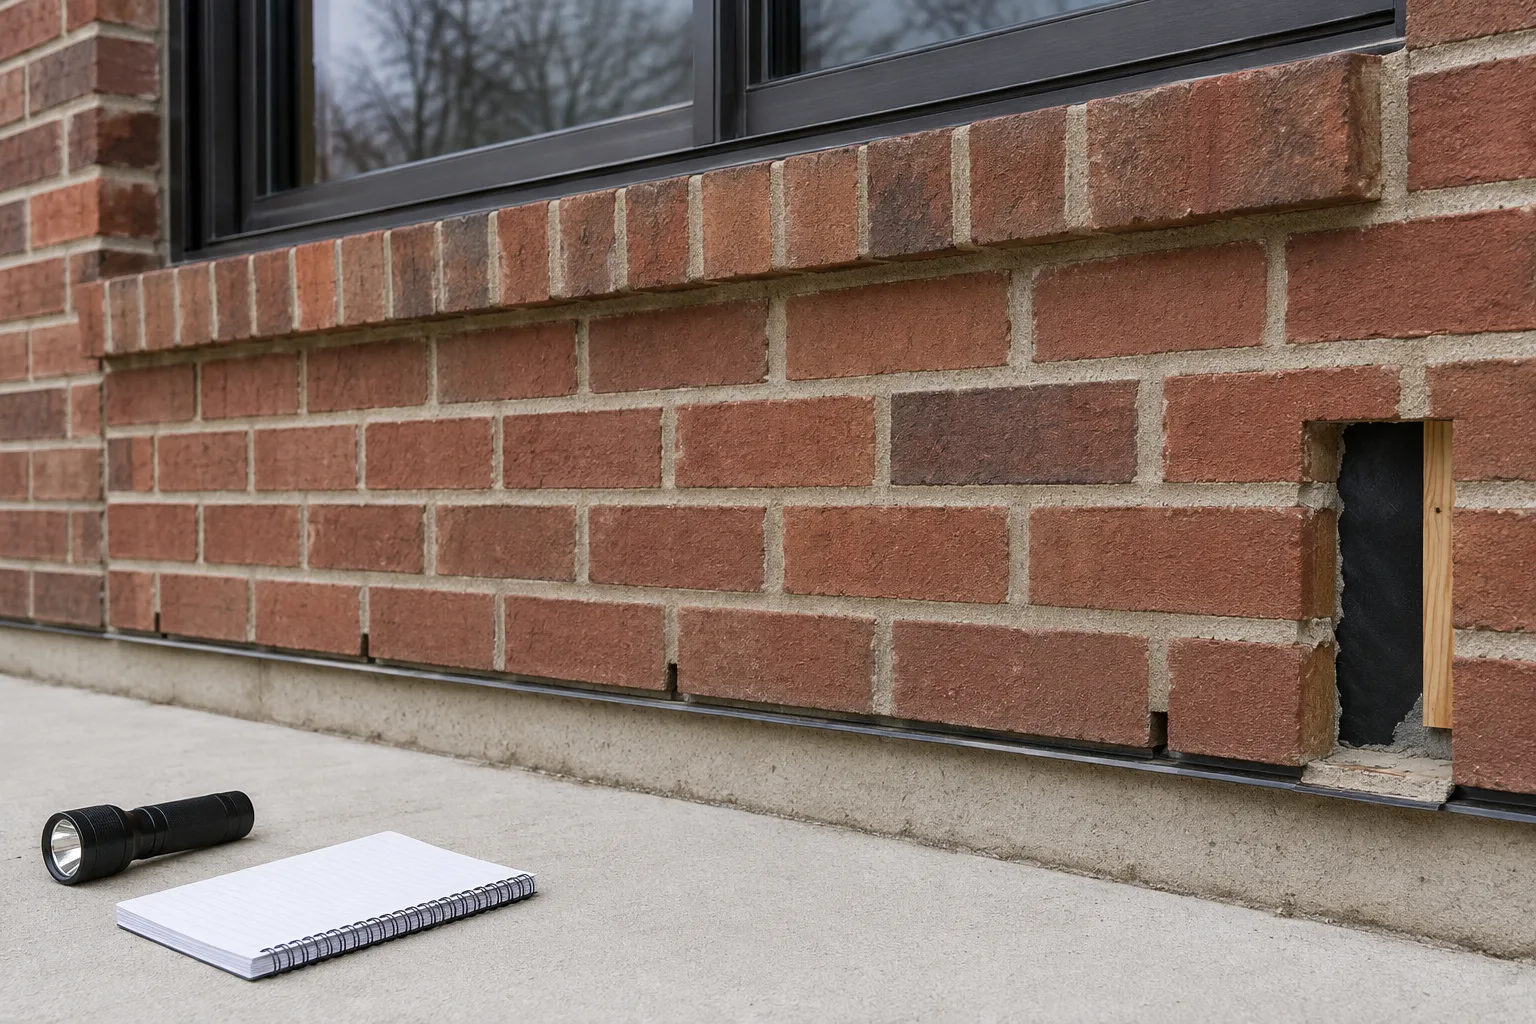
Start at the wall base and below windows. BIA guidance describes flashing that collects water at the bottom of a veneer drainage space and weeps immediately above the flashing. Narrow open head joints, tubes or wicks placed at intervals can therefore support a veneer diagnosis. They are not proof by themselves: some details are concealed, clogged, omitted or altered, and older multi-wythe walls can have drainage details too.
Next look for where the brick is vertically supported. A brick ledge at a concrete foundation or a shelf angle can indicate that the outer wythe carries its own weight separately from the backup. At windows and doors, compare the brick face with the interior jamb depth and look only at already exposed, weather-safe returns. Never remove sealant, flashing, trim or a brick to improve the view.
- Weeps immediately above visible flashing
- A brick ledge or designed shelf support
- A visible separation at a legitimate unfinished edge
- Wood, steel or CMU backup shown on plans
- Changes between the original house and an addition
Use interior thickness as supporting evidence
Measure the overall wall thickness only at a safe, finished opening such as a door or window; do not probe through trim. Compare the exterior brick face to the interior finish while accounting for the window or door frame, cavity, sheathing, framing and drywall. A thick return may be consistent with either veneer over framing or multi-wythe masonry, so the number is a cross-check rather than a verdict.
In an unfinished basement, crawlspace, attic return or utility room, an existing exposed edge may show the backup without disturbing the weather barrier. Photograph the layers in order and note where the observation was made. Do not assume a basement foundation detail continues through upper stories or around a garage, chimney or bay window.
- Use an existing opening, not a new probe
- Record layers from outside to inside
- Check more than one elevation or addition
- Keep an unknown cavity or backup labeled unknown
Why identification changes the mounting plan
An anchor works in a named base material and installation. Simpson Strong-Tie's masonry overview distinguishes solid and hollow brick, CMU and older multi-wythe construction; Hilti publishes separate masonry data and approval conditions for solid, hollow and multi-wythe bases. Those documents illustrate why a load table for solid concrete cannot be transferred to a brick face, mortar joint, hollow unit or mixed veneer-and-backup stack.
A fastener that crosses veneer, a drainage space and backup is not automatically validated because its end reaches something hard. The veneer can crack or be pulled toward the backing, the spacer condition may introduce bending, and a penetration can create a water path. The mounted-product instructions, anchor approval and project-specific wall detail must all cover the actual stack. If no published method covers that combination, use a qualified installer or engineer rather than assembling one from unrelated capacity numbers.
- Identify the exact structural base
- Confirm whether the attachment is allowed through a veneer
- Include the cavity and any standoff in the connection detail
- Preserve flashing and water-resistive layers
- Use exterior-compatible corrosion protection where specified
Make a stop-or-proceed decision before selecting hardware
Write a one-line wall description before shopping: for example, 'nominal full-brick veneer over an unverified cavity and wood-framed backup' or 'older multi-wythe brick, unit condition and solidity not verified.' If the description still contains an unknown that affects the load path, postpone hardware selection. A product search cannot resolve missing information about the building.
For a small, low-consequence accessory, relocation to a manufacturer-approved surface-mounted method may avoid an exterior penetration. For railings, awnings, satellite mounts, large signs, climbing equipment, overhead items or anything whose fall could injure someone, identification alone is not design. Obtain a project-specific attachment detail and any required permit or professional review.
| What you know | Decision | Next action |
|---|---|---|
| Only the exterior looks like brick | Stop | Collect plans and inspect legitimate exposed edges |
| Veneer is likely but backup and cavity are unknown | Stop | Verify the full stack and whether the mounted product permits it |
| Base material and wall layers are verified | Proceed to product review | Use instructions and technical data that name that exact base and installation |
| Load is structural, overhead, moving or high consequence | Escalate | Use a qualified designer or installer even after identification |
If drilling is approved, control the remaining risks
Mark edges, openings and known service routes before drilling. Use the exact bit, diameter, depth, drilling mode and hole-cleaning sequence required by the selected anchor system. Stop at unexpected metal, a void, a sudden material change or an early breakthrough; these observations mean the verified detail and the actual wall may not match.
Brick, block, mortar and concrete can contain crystalline silica. NIOSH identifies drilling as a task that can make respirable silica airborne. Use the tool and dust-control method required for the material and task, isolate occupants, wear appropriate protection and clean without redistributing fine dust. Exterior work also needs a documented sealing or flashing detail; cosmetic caulk is not a substitute for a connection and water-management design.
- Use a depth stop where the approved method permits
- Collect dust at the source
- Do not defeat flashing, ties or protective metal
- Follow edge-distance, spacing and torque limits
- Document the anchor model and final wall detail
Frequently asked questions
Does a running-bond brick pattern mean the wall is veneer?
No. Bond pattern is a clue to appearance and construction, but it does not prove the backup, number of wythes, unit solidity or load path.
Do weep holes prove that a wall is brick veneer?
They support the diagnosis when they occur with flashing and other drainage details, but no single feature proves the complete assembly.
Is brick veneer only a thin fake-brick finish?
No. Anchored brick veneer commonly uses a full nominal 3- or 4-inch brick wythe. Thin adhered brick is a different veneer system.
Can I drill one test hole to see what is behind the brick?
Do not use an exterior penetration as the first identification method. It can damage water-control layers, hit concealed services and still fail to identify the complete load path.
Can I anchor through brick veneer into a stud or CMU wall?
Only when the mounted-product instructions, anchor technical data and a verified wall detail cover that complete through-veneer installation. Reaching the backup does not by itself validate the connection.
Does a hard drill stop mean solid brick?
No. It could be another wythe, a CMU web, metal, concrete or an obstruction. Stop and reconcile the observation with the approved wall detail.
A practical next step
Before buying hardware, confirm the wall assembly and read the installation instructions for both the object and the exact fastener. If you need a starting category, use our Anchor Selector.
Sources and further reading
These primary and manufacturer resources support the safety and installation principles summarized above. Always use the current instructions for your exact product.
- Technical Note 28: Brick Veneer / Wood Stud Walls — Brick Industry Association
- Technical Note 28D: Brick Veneer / Concrete Masonry Walls — Brick Industry Association
- Supplemental Topics for Anchors: Masonry Base Materials — Simpson Strong-Tie
- Post-Installed Anchors in Masonry Design Guide — Hilti USA
- Silica and Worker Health — National Institute for Occupational Safety and Health